


 Quake Engines, Old and New
 Troubleshooting
 Quake Owner's Manual
 Quake Soundtrack Solutions
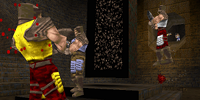 Deathmatch With Bots
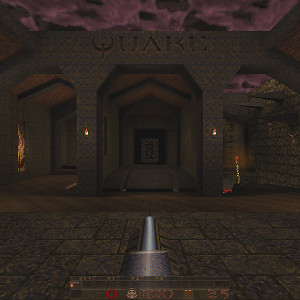
All the fundamentals of configuring Quake. Includes specific setups for widescreen support, mouselook, and more.
This guide is also hosted at the Steam community site:  Quake Owner's Manual
If you have comments, questions, corrections, or additions, please post a comment on the guide over there. Or, you can send me an email at my address at the bottom of this page.
Forum questions about Quake configuration have covered a lot of different ground in the past, so there's a lot of different topics to cover.
If you're not familiar with the available varieties of Quake engines – or even what “Quake engines” means – then you might want to take a look at this other guide first:  Quake Engines, Old and New
When you see a reference to ezQuake, FTE, Fodquake, DarkPlaces, QuakeSpasm, Fitzquake Mark V, DirectQ, Engoo, qbism Super8, ProQuake, or Qrack… all those odd words are names of other programs that can be used to play Quake. Read the Quake Engines guide if you want to learn more about them.
As for this guide, we lead off with a necessary warning about Windows issues and then go straight to a quickstart… an efficient way to start Quaking. If you're new to Quake then you should probably just follow the quickstart, and come back to the rest of the guide later as a reference if you have problems.
The next few sections get into general descriptions of how the Quake menus, config file, console, and command line work. If you're familiar with those ideas then you could skim or skip those sections.
The middle sections, from “Mouselook” through “Limits”, describe how to deal with some of the more fundamental bits of Quake configuration that aren't always easily handled through the menus.
The sections near the end contain cut-and-paste-able examples of command lines and config files for each Quake engine. But keep in mind that these examples are tuned specifically for my own tastes. You may want to do something different!
Finally the “More Info” section is a link dump in case you're not tired of reading about Quake.
In versions of Windows after Windows XP, some folders like “Program Files” and “Program Files (x86)” are treated specially. The contents of these folders have some protection against files being written inside them (or inside their subfolders).
Some older programs won't work if installed under these special folders. Some other programs work but have changed behavior.
Personally I don't install games under these folders, especially not old games. My Steam installation is under “C:\Games”, for example.
So the rest of the information in this guide was observed and tested with Quake installations outside of those special folders. If you have your Quake installation under a special folder, it might be perfectly fine. But I can't guarantee that it will behave the same way as mine.
If you want to jump right in and start Quaking with minimum effort, this section is for you.
First you should get a modern Quake engine. The basic idea is that you will download a new Quake executable. There may be some other files or folders along with it, but at a minimum you're getting a program that you will run to play Quake.
When you run this program, it will look for an “id1” folder in some location. Usually, at least on Windows systems, it will expect the “id1” folder to be placed right next to the Quake engine program. (But consult the docs for your Quake engine if you want to be sure.) So create the “id1” folder if it doesn't yet exist.
Quake requires two files inside the “id1” folder: “pak0.pak” and “pak1.pak”. You can get those two pak files from your Steam copy of Quake, or any other Quake installation. Once you have moved or copied those files into your “id1” folder you can start playing.
Below are my recommendations for popular, full-featured, menu-driven modern Quake engines that require a minimum of unintuitive tomfoolery to configure. There are other fine choices though! I don't want to start a holy war, just to give folks a quick way to get started. Please read the Quake Engines guide if you want the complete picture.
The Quake Engines guide also describes how you can launch a modern Quake engine through the Steam UI (and why you might want to).
If you're going to get into Quake multiplayer, you'll probably want to get familiar with the difference between QuakeWorld and NetQuake, as described in the Quake Engines guide. Although if you intend to play over an internet connection that isn't the best, then QuakeWorld may be your only real option.
For QuakeWorld, the ezQuake engine is a good choice.
(Note that the non-Windows versions of ezQuake are not as well maintained as the Windows version. If you intend to play QuakeWorld on OS X or Linux, then you will probably need to check the Quake Engines guide to find some other engine that fits your needs.)
If you want to get ezQuake along with a collection of new textures, HUDs, etc. then you can use the nQuake package. See the ezQuake section of the Quake Engines guide for more details.
When you're using ezQuake you can set up just about everything through the menus. It's probably worth taking a look at the “Display” sections later in this guide if you want to get everything just right though.
On the other hand if you are checking out NetQuake multiplayer instead of QuakeWorld, then give ProQuake a go. If you're playing on Windows, you may want to use the ProQuake installer for Steam Quake owners.
For the best combination of authenticity and compatibility with various content, the singleplayer engine of choice should be QuakeSpasm. Get into its options menu, enable mouselook, and away you go. If you're playing on Windows, you may want to use the QuakeSpasm installer for Steam Quake owners.
The DarkPlaces engine is also popular, particularly if you want to change Quake's look ‘n feel. DarkPlaces has good in-game menus, but I’d recommend at least taking a look at the “Display” sections below in order to finish up your configuration. Also check the DarkPlaces section of the Quake Engines guide for more info about some installers and bundles you might be interested in.
That's it, quickstart done! If you have problems you might want to first check in at the Troubleshooting guide: Troubleshooting
You can treat the rest of this guide as a reference for when you want to learn more. It will be especially useful for some of the other Quake engines, and double-especially if you are trying to get the original Quake engines to behave.
The version of GLQuake distributed with Steam (0.95) is not the latest version for some reason, and it is a bit crashy. It also does not understand some of the options described in the “Display” section of this guide.
You can get a more recent version of GLQuake (0.97) from the official id software FTP site and elsewhere. This version is better, but still doesn't support FOV changes.
(Steam guides don't support FTP links, sorry… cut and paste into your browser address bar.)
Version 0.98 of GLQuake adds FOV support. It was never officially released, but the Windows version has been available around the web and used by Quake players since way back in the 20th century. So if you want an OpenGL renderer and don't want to use a modern Quake engine – and you are using Windows – then GLQuake 0.98 is the version I'd recommend. One link that is still working: http://www.quaketerminus.com/nqexes/glquake098alpha.zip
When you're installing any downloaded version of id's original GLQuake engine, do not enable any installer option that mentions a “3Dfx GL miniport”. Similarly, discard any library file (like “opengl32.dll”) that comes with the download. Those things are only useful if you're rocking a 3Dfx Voodoo graphics card from 1996. These days, all you need is the GLQuake executable. (I'm only speaking from experience with the Windows version; not sure about the Linux version.)
But you really should just use a modern Quake engine instead and avoid these worries altogether!
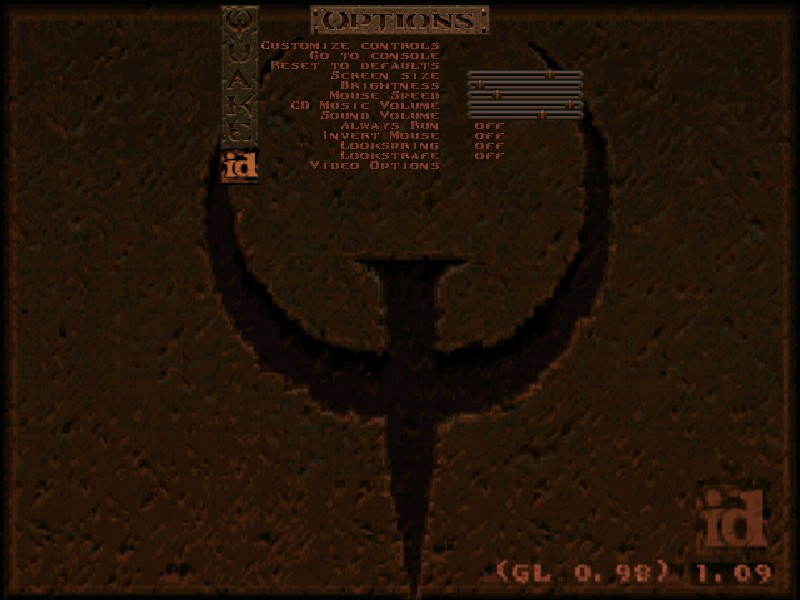
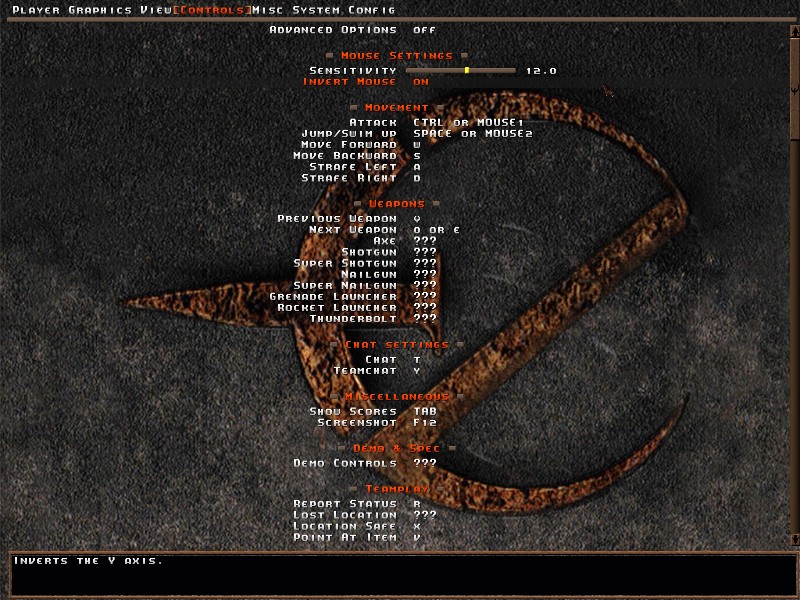
Let's get the obvious stuff out of the way first. Explore the options menu! If you don't see a way to get to the options menu, try pressing ESC. The pictures below are an example of the rather simple menu in GLQuake and the comprehensive multi-section menu of the ezQuake engine:
At a minimum you want to enable the “Always Run” option, and you may also want to “Invert Mouse” if you swing that way. Set up your movement keys, etc.
Unlike other Quake engines, the Qrack engine doesn't have any keys bound by default, if you start it up in a “clean” install. When you first run Qrack it will try to import any existing Quake settings, including key bindings. If it can't do this import then you'll have more work than usual to do in the menus.
(Specifically, it attempts to import settings from the “config.cfg” file in the “id1” folder; see the section below about “The Config File”.)
Modern Quake engines can have a ton of menu options. It can be a little intimidating, since some of the mega-menus are obviously aimed at people who are already familiar with Quake, but it's worth looking through everything.
In ezQuake you can also enable an option to “Auto Save on Quit” which makes it unnecessary to explicitly save your settings. At first it might seem like a no-brainer to turn this on. But it can be nice to be able to freely experiment with settings, while knowing that if you totally screw things up you can just quit the game and everything will revert. If you're using the nQuake package, this setting might or might not be enabled (depending on which version of nQuake you installed), so you should check to see whether it is set the way you want.
You'll almost certainly want to adjust settings beyond those provided in the in-game menus, so that's what the rest of the guide will be about. Before we get to talking about those specific settings, we'll first cover how you can really get under the hood to reach them.
Changes that you make using the in-game menu, and some other changes that we'll get to in a minute, are stored in a file.
The name and location of this file depends on which Quake engine you are using. For the original Quake engines, the rules are simple:
For example, Steam will normally install Quake in the “steamapps\common\quake” folder under your Steam folder, so in that case the config files will be placed in the “steamapps\common\quake\id1” folder or the “steamapps\common\quake\qw” folder.
Modern Quake engines may have different ideas about where to store their configuration. Many engines still just use “id1\config.cfg”, but some engines use different files:
Playing a mod or missionpack can have an effect on how your configuration is stored.
A mod or missionpack consists of additional files that are placed in their own subfolder, parallel to “id1” and “qw”. When you want to play the mod/missionpack in singleplayer, you use a command-line option to select that folder, according to the instructions in the mod's readme file. (Command-line options are covered in another section below.) negke's guide to custom maps/mods discusses that: Custom Singleplayer Levels
We'll ignore QuakeWorld, GLQuakeWorld, and Fodquake for this section; those engines don't support singleplayer.
For ezQuake and FTE, playing a mod doesn't affect the location of the config file – probably because even though these engines have some singleplayer support, they are primarily aimed at QuakeWorld multiplayer.
For all other Quake engines, when you play a mod your configuration will be stored in that folder. If no config file exists there, then it will first be copied over from its original location. So when you first start up a mod, you should see your familiar configuration.
While running a mod, you may want to make changes specific to that mod, such as binding a key to a new weapon. Any changes you make to your configuration while using a particular mod will only affect the config file in that folder.
By using the Quake console – which is essentially just a large box for text entry and message display – you can check and change the values of console variables. Think of console variables as “settings”; in fact many of them are directly used for storing settings that you choose from the in-game menus, such as sound volume or the name of your multiplayer character.
The console also allows you to execute some commands. A command isn't necessarily setting a value that you can read back, but it does something to change the state of the game. One of the simpler commands, for example, is “quit” to exit the game.
(Note that lots of documents will just use the term “console commands” to refer to both the variables and the commands.)
How you access the console depends on the current state of the game. Some modern Quake engines will dump you directly into the console when they start up, and you have to press ESC to get the main menu. Or vice-versa. Most of the time however you will be seeing the “attract reel” demo on startup, or playing a game, or maybe watching a game recording. In these situations you have to press the “console key” to open the console. (And press the same key to close it again.)
The console key is on the upper left of your keyboard. On US keyboards this is the key that has the backtick “`” and tilde “~” characters on it. On some international keyboards it may be the caret “^” key. In any case it should be that key in the upper left, below the ESC key and left of the number keys.
Instead, if you want to get to the console when you are in-game with the Qrack engine, you will need to press ESC to get the main menu, choose “Options”, then choose “Go To Console”. Once you're done, press ESC to close the console.
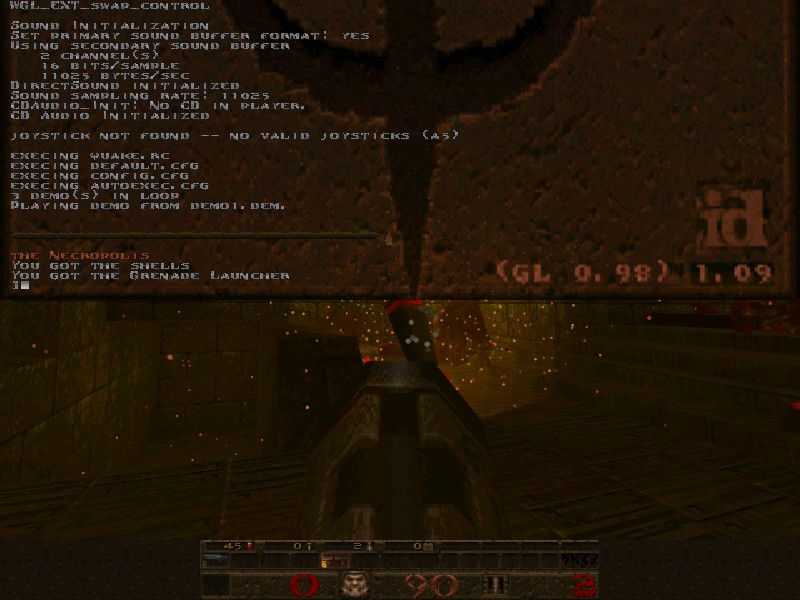
The image below shows an open console while the “attract reel” is running in GLQuake. The prompt and cursor at the bottom of the box is where you can type in settings and commands; the rest of the box shows a history of messages from the engine, and of what you have typed (in this image, nothing yet).
For one thing, it may be faster to use the console to enter commands or change settings, compared to using the graphical menus. If for example you're in the middle of a game and you want to fiddle with the sound volume, one way to do this is of course to press ESC to bring up the menu, navigate to the options menu, find the volume setting and drag the slider. But alternatively you could use the console. Open the console, type
volume
and press Enter. (Note that you could actually just type “vol” and press Tab, rather than typing out “volume”, because the console supports tab-completion.) This will ask Quake to show you the current value of that variable. For example you might see this message in response:
"volume" is "0.7"
If you want to change the value, you could type something like
volume 0.4
and press Enter. Then close the console and continue playing.
More importantly many of the commands and console variables are just not available at all through the graphical menus, especially in older Quake engines. For example you can use the “map” command to load a different map in singleplayer, or “changelevel” to switch to a different level while preserving your current inventory. Are you in the middle of e1m1 and you'd rather skip straight ahead to e1m2? Open the console, type
changelevel e1m2
and press Enter. There you go.
The available console variables and commands differ between Quake engines, but many of the most important ones are the same. For modern engines, the final authority is the documentation that you downloaded with the engine or that is online at the engine's website. For the original Quake engines you can dig up the necessary info by searching the web for Quake console information (and almost all of that will still apply to modern engines).
As an example of some of that original documentation, see the “Console Commands” section of the Quake Info Pool, or the “Console Commands List” section of this archived info from PlanetQuake.
In the cases where a console variable is just storing the setting for some menu option, it doesn't matter whether you change it through the console or through the menu. The results are the same.
Most of the settings covered in this guide are described in terms of console variables. Some of the modern Quake engines – the ones with really extensive menus – will have menu options that handle some of these settings too. To keep things as straightforward as possible, for now I'm just going to cover the console variables. (I might add notes about the menu options in various engines later, if I can think of a way to do that without making this guide longer and messier.)
The bottom line is that if you come across a menu option that has the same effect as one of these console variables, feel free to use it.
Some of the settings changes that you make through the console will be saved to the config file, so that they will still be in force the next time you run Quake. Generally speaking any variable that corresponds to some menu setting will be saved. But other variables might not be.
In this guide I'll try to be clear about which will be saved and which won't; but if you're ever unsure then it's easy enough just to check – restart Quake and use the console to check the value of that variable. Or quit Quake and use a text editor to search for the name of that variable in your config file.
As a rule of thumb, modern QuakeWorld engines (ezQuake, Fodquake, FTE) should save every setting in the config file. (They may not save automatically though! See the info box in the “In-Game Menu” section for details.)
With other Quake engines, some of your preferred settings may not get saved to your config file.
You can take those unsaved settings, put them in a new file (one on each line of the file), and place that file inside one of the game data folders that Quake sees – usually the “id1” folder is a good choice. The “exec” console command or the “+exec” command-line option will cause Quake to “execute” that file: to treat it as if each line was typed into the console. For example this console command will execute a file named “mysettings.cfg”:
exec mysettings.cfg
Most Quake engines also have a handy feature that will save you the trouble of using the “exec” command. If there is a file named “autoexec.cfg”, Quake will automatically execute that file on startup. So the usual way to deal with settings not saved in the config file is to put them into an autoexec.cfg file.
Once settings are in autoexec.cfg you can stop worrying about them; they will be automatically applied when Quake starts. If you ever want to change any of those settings, edit the autoexec.cfg file.
If you do want FTE or Fodquake to use autoexec.cfg – for example when playing a mod that has an autoexec.cfg file – then you can use the “+exec” command-line option like so:+exec autoexec.cfg
See the section on “The Command Line” below if you're not familiar with using command-line options.
So to sum up what we've got so far: modern QuakeWorld engines generally stash every setting in the config file. Other engines don't, but you can get around that using autoexec.cfg. That's sort of straightforward, but there's one major “gotcha” with autoexec.cfg: precedence.
Quake can look for files in a lot of places, and so it could end up finding multiple autoexec.cfg files. When this happens it will only execute one autoexec.cfg file: the last one it finds. It will “forget” about the others.
If you have an autoexec.cfg file that is mysteriously not being used, probably the reason is that Quake found some other autoexec.cfg file to use instead.
If you have a simple Quake setup this is not going to be an issue, but if you start playing around with mods or juggling multiple configurations then it can bite you.
The rules are:
As an example of how this can surprise you: if you use the nQuake package, you may not realize that it sets up a configuration using an autoexec.cfg file inside “nquake.pk3” in the “qw” folder. When you run a QuakeWorld engine while the nQuake content is present, any loose autoexec.cfg file in “id1” or “qw” is going to be ignored in favor of the autoexec.cfg that is inside “nquake.pk3”.
ezQuake provides a menu option called “Save Unchanged Options”. If this is disabled, then only variables that differ from their defaults will be saved to your config file.
While it might seem like you should disable this to tidy up your config file, it's probably best to have it enabled. Confusing stuff can happen otherwise.
For example, nQuake includes an extensive configuration that is loaded when you start up ezQuake (by virtue of the nQuake autoexec.cfg described above). If you want to change any of these options back to their default values in your own config, then you must have “Save Unchanged Options” enabled. Yeah it's a little counterintuitive.
You may know that you can manually start Quake from some command shell in your operating system. For example on Windows you could open a command shell using the Command Prompt program, type commands into that shell to navigate to your Quake folder, and then enter
GLquake.exe
to start up Quake (in this case, the GLQuake engine).
It's possible to put more things after the program name in order to control its behavior; these things are called command-line options. Several kinds of behavior can only be forced using command-line options, rather than with console variables or config files. This is especially true for the original Quake engines.
If for example you want to make sure that Quake doesn't try to play music from the current CD in the drive, you can disable CD audio with a command-line option:
GLquake.exe -nocdaudio
You can specify as many command-line options as you like, as long as you separate them with spaces.
Of course usually you don't start Quake from a command shell. Instead you usually launch it by clicking an icon or button. In these cases it might not be obvious how to send command-line options to the engine, but it's still possible as described in the sections below.
The available command-line options differ between Quake engines, but many of the most important ones are the same. For modern engines, the final authority is the documentation that you downloaded with the engine or that is online at the engine's website. For the original Quake engines you can dig up the necessary info by searching the web for Quake command line information (and much of that will still apply to modern engines).
As an example of some of that original documentation, see the “Startup Commands” section of the Quake Info Pool, or the “Command Line Parameters” section of this archived info from PlanetQuake.
You can also use command-line options to execute console commands and set console variables, by preceding the console command or variable name with the “+” symbol. This isn't terribly useful for most settings – usually you should instead just set them permanently in the config file or autoexec.cfg – but some console commands can be useful on the command line. For example you could launch GLQuake directly into dm4 to practice your lava-diving with the command line
GLquake.exe +deathmatch 1 +map dm4
That may not be the way you always want to launch Quake, but if it's something that you do from time to time, it could be handy to create a shortcut for it (as described below).
If you have a long series of console settings/commands that you want to execute on launch, you don't have to specify them all on the command line. Instead you could put them in a file (for example named “myscript.cfg”) stored in some game directory visible to the Quake engine, and use the “exec” command to read that file:
GLquake.exe +exec myscript.cfg
You may be launching Quake using Steam, especially considering which website you're on right now! You need to use Steam if you're running the Quake executables that Steam provides. Also some folks replace those old executables with modern Quake engines but still launch them through Steam to take advantage of the Steam overlay, Steam Cloud for config and savegames, time-tracking, and the convenience of having a unified launcher for all their games. (This works fine if you rename the modern engine executable to have the same filename as the old executable that you're replacing.)
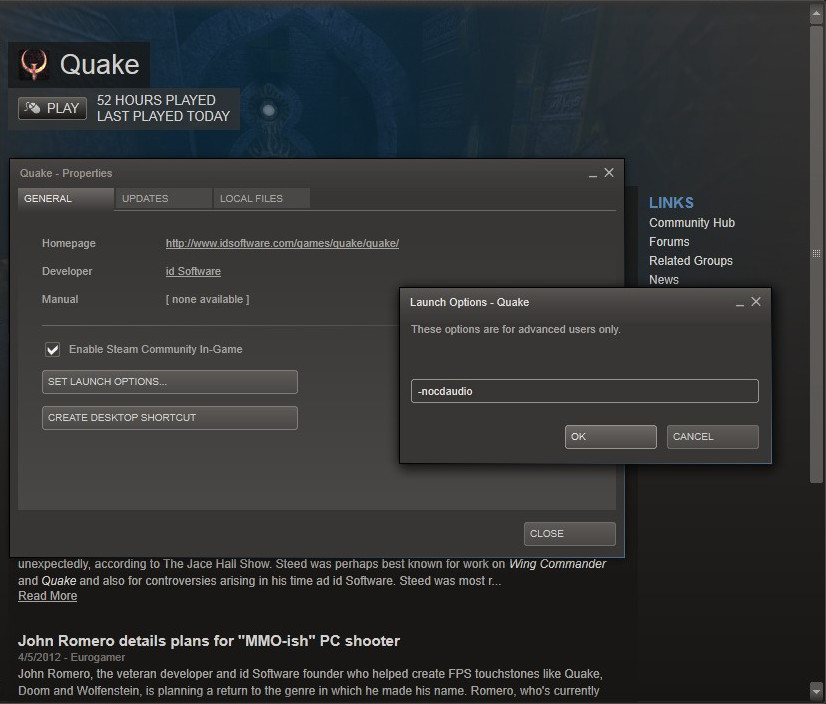
To set up command-line options for a Steam-launched Quake engine:
The “launch options” that you set through Steam should make up all of the command line except the name of the program itself. So to re-use the example of disabling CD audio, the text that you would enter into the “launch options” box for that purpose would be
-nocdaudio
like so:
If you have not replaced the Quake programs that were downloaded by Steam, this is the only way to specify command-line options. If you try to start up of one those Quake programs from a shell or shortcut or whatever means outside of Steam, it will still launch through Steam, and Quake will use the options (or lack of options) defined here in Steam's “launch options” dialog.
If you're running some modern/replacement Quake engine rather than the programs downloaded by Steam, you can also specify command-line options when launching Quake outside of Steam. The way to do this depends on your operating system. The best solution for you may be a script, shortcut, batch file, or even holding down some modifier key when launching the program. Completely covering all of these options is outside the scope of this guide, but I'll just mention one solution that is handy on Windows.
On Windows one way to provide command-line options is by using a shortcut:
Now whenever you open/execute this shortcut, just as if it were a program, you will launch Quake with your desired set of command-line options.
Non-Steam Quake engines can also be run with command-line options by using a launcher program.
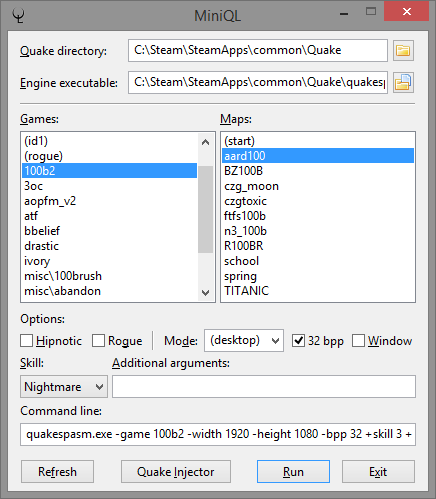
For Windows users, MiniQL is a great tool. It helps you select mod, map, and a few other common options, while also letting you add any other command-line options you need:
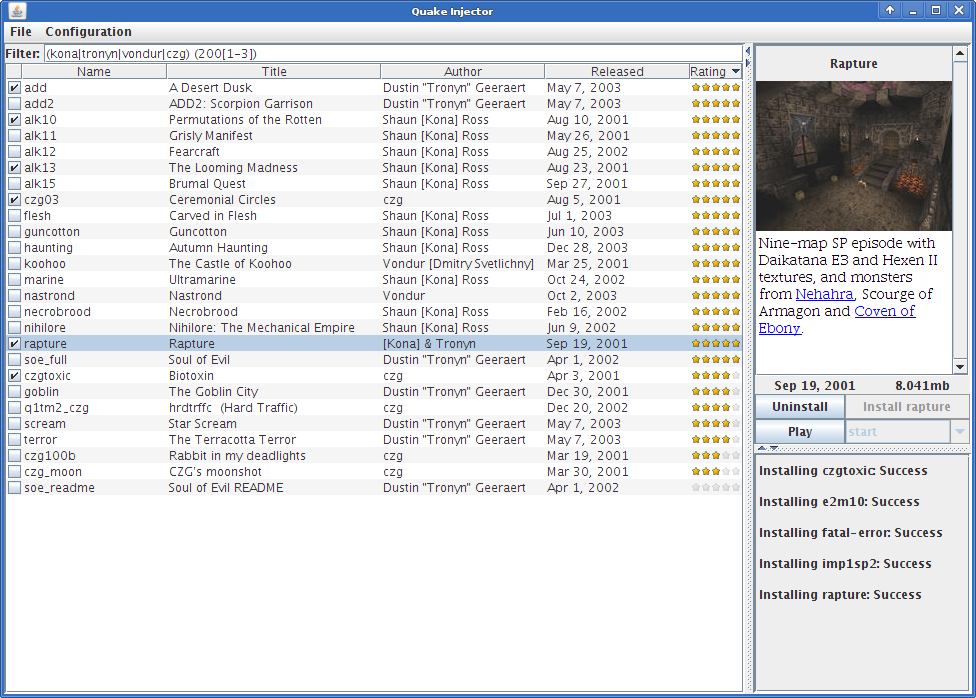
Another nice Quake launcher is Quake Injector, which works on Windows, OS X, and Linux. Quake Injector is dedicated to running singleplayer maps, and it can automatically download/install/launch SP maps from the vast Quaddicted map archive:
negke's guide to running singleplayer maps has more details about Quake Injector: Custom Singleplayer Levels
And that's about it for talking about the general ways to muck about with Quake configuration. Now we'll cover some of the specifics.
If you are using the latest version of ezQuake, FTE, Fodquake, DarkPlaces, Fitzquake Mark V, DirectQ, qbism Super8, ProQuake, or Qrack then you already have mouselook enabled. Good for you!
If you don't have mouselook enabled, and you can't find a menu option to enable it, then you need this line in your autoexec.cfg file:
+mlook
If you are using QuakeSpasm (or an old version of Fitzquake Mark V), you could also just enter “+mlook” in the console, and it will be saved to your config file. The original Quake engines however do not save it to the config file, and you must put it in autoexec.cfg.
The Engoo engine has a menu option to enable mouselook; this will set an “m_look” variable to 1 in Engoo's “config.rc” file. If you're used to dealing with other engines by putting “+mlook” in autoexec.cfg as above, this new setting might confuse you, because it essentially flips the sense of “+mlook”. In Engoo you will have mouselook enabled if one of these is true: “m_look” is 1, or “+mlook” is active. If both or neither of those are true, then mouselook will be disabled.
Note that regardless of which engine you use, you do not want to enable “lookspring” or “lookstrafe”. Those behaviors get in the way of mouselook.
You can choose to invert the mouse Y-axis using the in-game menu, but you can also set this behavior through the “m_pitch” console variable. Non-inverted mouse behavior is
m_pitch 0.022
and inverted mouse is
m_pitch -0.022
This setting is saved in the config file.
The in-game menu gives you a way to change your mouse sensitivity, but it's faster to use the console if you want to experiment with different values. The name of the console variable is “sensitivity”. This setting is saved in the config file.
Some engines (Fitzquake Mark V, DirectQ, Engoo, ProQuake, and the original Quake engines) enable some degree of vertical auto-aim by default. This can be really frustrating when using mouselook. To completely disable vertical auto-aim in singleplayer, have this line in your autoexec.cfg file:
sv_aim 1
You may see guides that recommend “sv_aim 2”, and that's also fine. All values of 1 or more will disable auto-aim.
When “sv_aim” is set to 1 (or more) on a server, it will disable auto-aim for all clients.
QuakeWorld servers have an “sv_aim” value of 2 by default, but if for some weird reason you are playing on a QuakeWorld server that has some degree of autoaim enabled (using an “sv_aim” value less than 1), you can opt out of that with this setting in your own configuration:
noaim 1
(Using “noaim 1” will also slightly reduce the amount of processing the server does when you fire a projectile, although that doesn't really matter these days.) In modern QuakeWorld clients “noaim” will be 1 by default.
In NetQuake the “noaim” setting doesn't exist, so you're at the mercy of the server settings. But in practice any well-configured NetQuake or QuakeWorld server is going to have auto-aim disabled and you won't have to worry about this in multiplayer.
If you're picky about mouse input you may want to experiment with putting “-dinput” on the command line to enable DirectInput mouse processing.
If you prefer mouse smoothing, you can enable it with
m_filter 1
If your engine of choice doesn't save that to its config file, then place it in autoexec.cfg. (Note that QuakeSpasm and DirectQ don't support this variable at all.)
Different Quake engines also can provide different mouse feel.
You can set “Always Run” using the in-game menus, but you can also set it through console variables. By default the “cl_forwardspeed” and “cl_backspeed” variables each have a value of 200, but you can enable “Always Run” by increasing them to 400:
cl_forwardspeed 400
cl_backspeed 400
Values higher than 400 won't help you go any faster, by the way. :-)
These settings are saved in the config file.
For many of the Quake engines from GLQuake onward, setting your desired video resolution has been a bit of a puzzle. The following sections cover a few different approaches, since there's not a one-size-fits-all solution.
If you've taken a time machine back to the 90s so that you can play on a tiny screen using a 4:3 aspect ratio, then after you set your video resolution you don't have any other major display issues to worry about. If not, though, then you'll have a few other things to consider.
For one thing, when using a modern-sized monitor the statusbar display on the screen can be unnecessarily large. You may want to shrink it down.
And if you're using a widescreen resolution, you will want to have a properly-shaped statusbar (not “stretched”) and a wider in-game field of view. Some engines will automatically take care of one or both of these issues for you, but in other cases you'll have to manually configure the display.
It's not surprising that you might want to change the size of the HUD. It's a little more unusual to have to worry about its shape, but in some Quake engines that's necessary too. If you're using a widescreen resolution then your statusbar, weapon display, and even the console text can get stretched out horizontally unless you take steps to fix them.
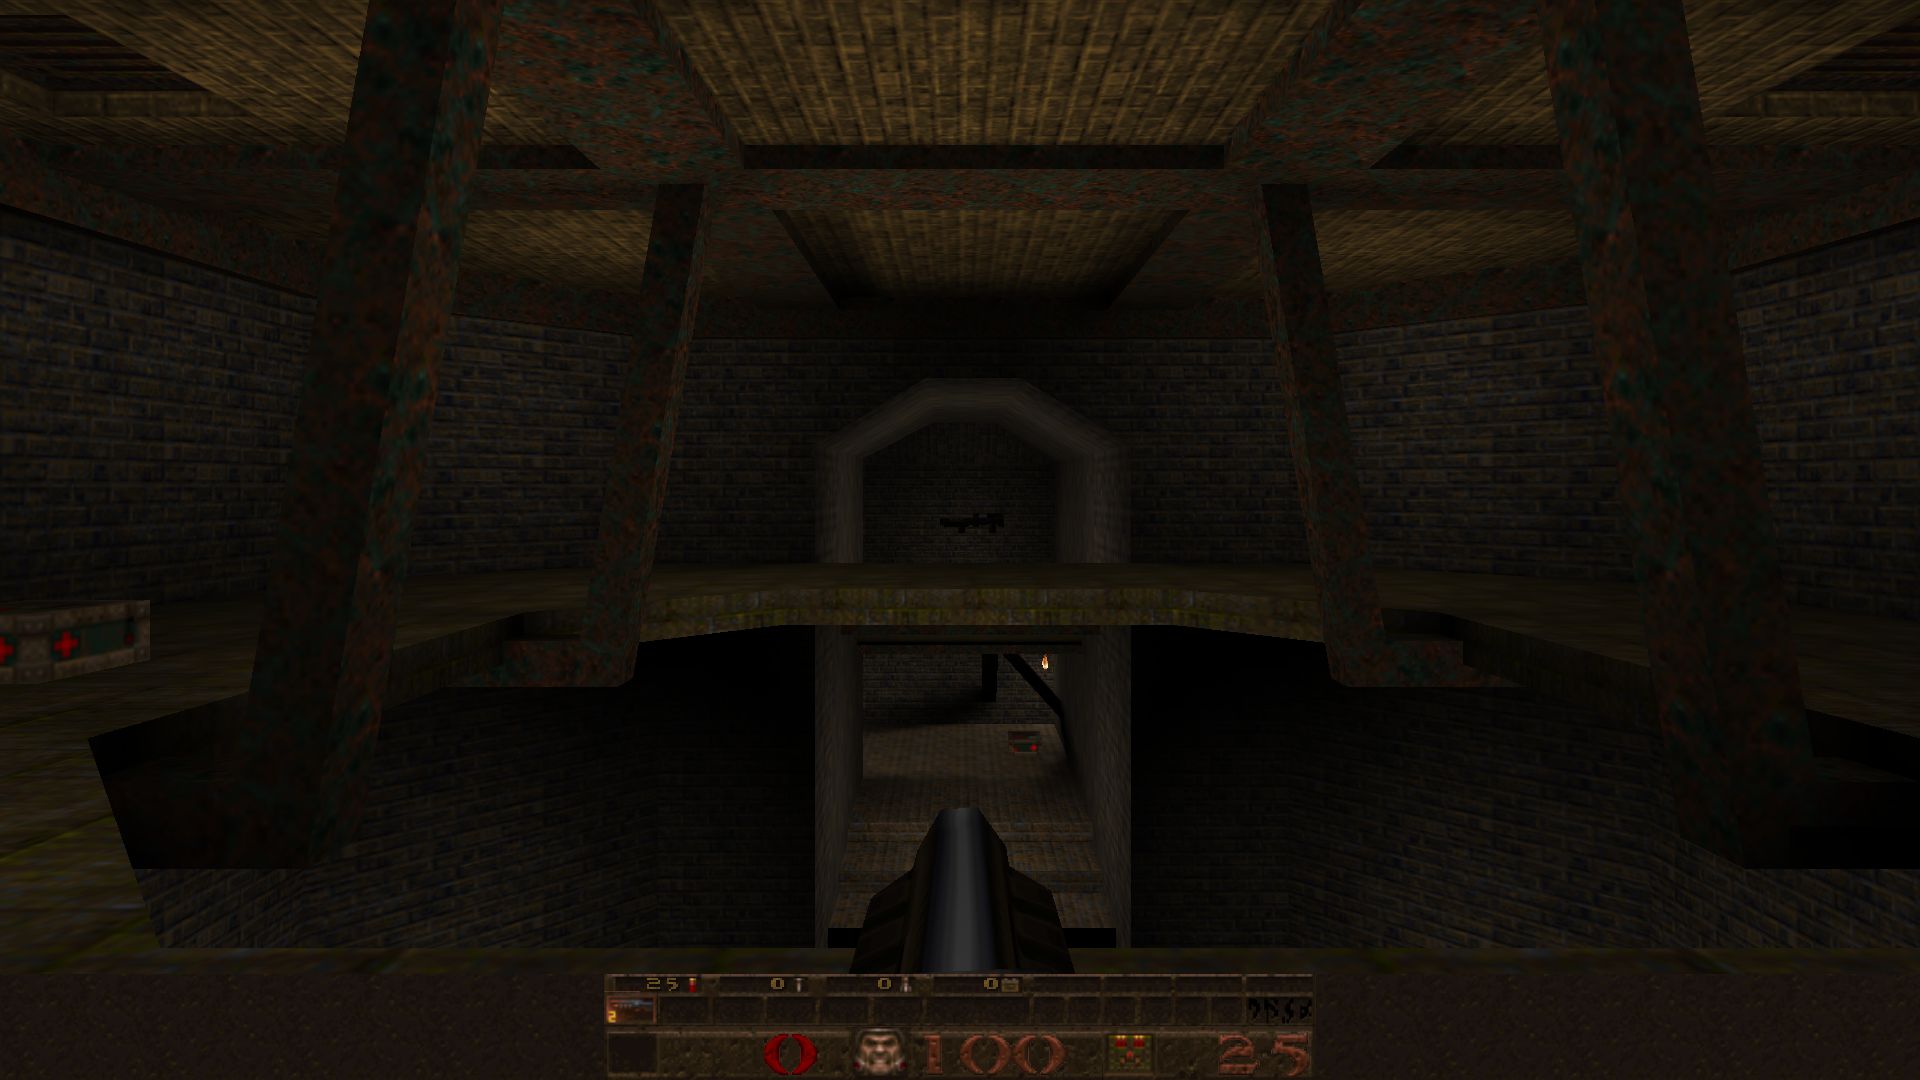
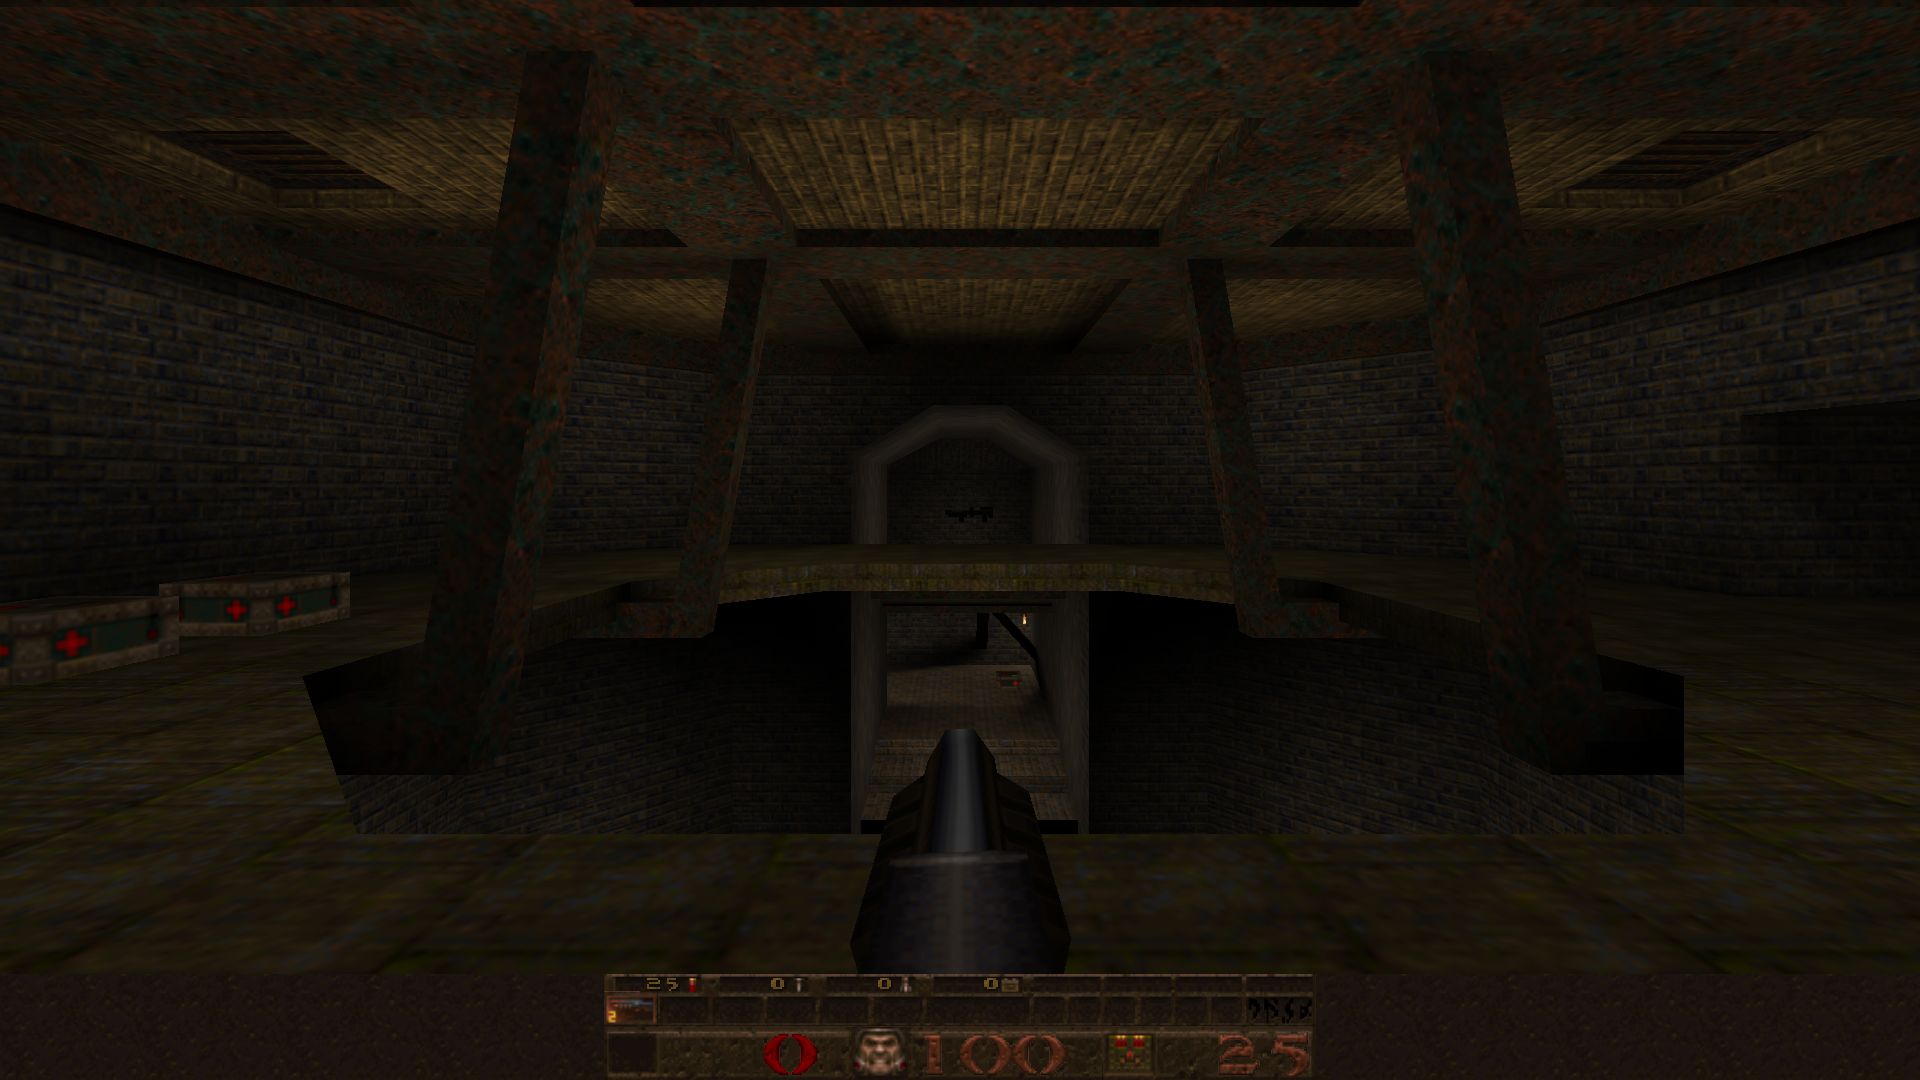
The two pictures below illustrate the problem using GLQuake 0.98 with a widescreen resolution. This resolution has a 16x9 aspect ratio, instead of the 4:3 aspect ratio common in older Quake-era monitors. The top picture shows the view with a widescreen resolution but no other changes/fixes; you can see that the statusbar and weapon are stretched. If the console was open, you'd see that its text was stretched too. The bottom image shows the view after this stretchiness has been fixed through some additional configuration.
In the Quake engines that have this issue, it turns out that the shapes of all these HUD elements, as well as the overall size of the statusbar and the console text, are controlled by settings for the width and height of the console. Different engines specify console dimensions through different methods (which the sections below will describe), but the overall concept is the same:
To get the right shape for HUD elements, you want the console width/height to have the same ratio as your screen resolution's width/height. Personally I like to keep the console height as close to 480 as possible to match the original WinQuake design, where the console dimensions were 640x480. So for 16:10 resolutions I use 768x480 for the console dimensions; for 16:9 I use 864x486.
You may also want to adjust your viewsize. Viewsize can be increased/decreased by different methods which can include: a “viewsize” console variable, a menu option, or the “+” and “-” keys. Decreasing the viewsize will just shrink the area of the screen that shows the gameworld, and this isn't too useful on modern systems. Increasing the viewsize can have interesting effects if you continue to increase it even after the screen is filled; increases past this point will typically start removing HUD elements. (A corollary: if you seem to be missing HUD elements, trying shrinking the viewsize.)
The original field of view (FOV) for Quake is 90 degrees horizontally. If you are used to this for a 4:3 resolution, then when you switch to a widescreen resolution it can seem cramped and even make you motionsick.
A larger FOV can also just give you an advantage from seeing more, although if you increase it too much you get fisheye effects that can be disorienting and make it harder to aim. In the end the right setting is a matter of personal taste.
I use an FOV of 100 horizontal degrees for 16:10 resolutions, or 106 for 16:9, since these horizontal FOV settings result in approximately the same vertical FOV that I was used to on a 4:3 display. For example, the top image here uses a 90 degree FOV on a 4:3 display (like original Quake); the bottom image uses 106 FOV on a 16:9 display. Notice how in both images you can see the same amount of your surroundings vertically, and the 16:9 display shows more stuff to the left and right.
Some Quake engines will automatically adapt your FOV as you change resolutions. These engines support an “fov” console variable that specifies the desired horizontal FOV for a 4:3 aspect ratio, and the correct FOV for the aspect ratio of your current video resolution will be calculated based on that info.
For other Quake engines you will need to manually set your desired FOV. In these engines the “fov” console variable directly specifies the horizontal FOV, regardless of your video resolution.
In these two original Quake engines, you can set your desired video resolution using in-game menus, although you will not be able to choose widescreen resolutions.
Note that the in-game menus also allow you to mark your current resolution as the “default”. Once you have chosen a resolution, remember to mark it as default, so that Quake will start up with that resolution in the future. (For other Quake engines this is not an issue.)
For the original GLQuake or GLQuakeWorld engines, you have to use the command-line options “-width” and “-height” (not console variables) to specify your desired resolution. For example:
-width 1920 -height 1080
For all of the other Quake engines discussed in these guides, you'll be able to choose video resolutions using in-game menus. Widescreen resolutions should be available if your current video monitor/card/driver supports them.
If you're using Engoo, note that the current Engoo version as of this writing (2.77) has a bug where it will not remember your resolution, even if you choose a default resolution. You'll have to re-set your video resolution each time you start up Engoo.
In these two original Quake engines, you cannot change the shape or size of HUD elements.
GLQuake and GLQuakeWorld have the HUD shape behavior described in the “Display” section above. So if you want to change the size of the statusbar and console text, or if you are using a widescreen resolution and need to fix the shape of the HUD elements, you'll need to specify the console width and height.
For GLQuake (version 0.97 or 0.98) and GLQuakeWorld, console width and height are specified using the command-line options “-conwidth” and “-conheight”. (Not console variables.) So these would be good GLQuake/GLQuakeWorld command-line options for a 16:9 resolution:
-conwidth 864 -conheight 486
or for a 16:10 resolution:
-conwidth 768 -conheight 480
Note:
These engines support setting console dimensions using the “vid_conwidth” and “vid_conheight” console variables, which will save to the config file. So for a 16:9 resolution you could use
vid_conwidth 864
vid_conheight 486
or for 16:10 you could use
vid_conwidth 768
vid_conheight 480
Notes:
These engines always provide the correct shape for HUD elements and console text.
If you do want to change the scaling of those elements, you can set the “vid_conwidth” and “vid_conheight” console variables as described above. Or you may have other options available through the console and/or the in-game menus:
These engines always provide the correct shape for HUD elements and console text.
If you want to change the size of the console text, use the “scr_conscale” console variable.
If you want to change the size of the status bar, use the “scr_sbarscale” console variable. You may also want to try using the video options menu and/or the “scr_sbaralpha” console variable to affect the statusbar transparency. DirectQ has more menu options for statusbar styling.
HUD elements and console text will have the correct shape in Engoo.
If you want to change the statusbar size, you will need to disable “automatic scaling” in the view options menu, and then change the “graphics scale” slider. (These menu options correspond to the “scr_retroscale” and “scr_scale” console variables.) These options will also change the scale of on-screen menus, but not of the console text.
HUD elements and console text will have the correct shape in qbism Super8.
If you want to change the statusbar size, you can change the “status bar scale” slider in the video options menu. (This option corresponds to the “sbar_scale” console variables.) I'm not aware of a way to change the console text size.
HUD elements and console text will have the correct shape in ProQuake.
If you want to change the size of those things, change the “console width” setting in the Advanced Settings part of the options menu. (This option corresponds to the “vid_consize” console variable).
For the majority of the engines discussed in these guides (WinQuake, QuakeWorld, GLQuake, GLQuakeWorld, ezQuake, DirectQ, qbism Super8, ProQuake, and Qrack) the horizontal field-of-view is directly set through the “fov” console variable.
Notes:
DarkPlaces, FTE, Fodquake, QuakeSpasm, Fitzquake Mark V, and Engoo have a different interpretation of the “fov” console variable. In these engines, “fov” specifies your desired horizontal field-of-view for a 4:3 aspect ratio. The actual horizontal FOV you see on your screen will be adjusted depending on the current aspect ratio of your video resolution.
In practice this means that you can just leave “fov” set to a value of 90 in these engines and not worry about it. If you do want to make some adjustments to your FOV you can try increasing or decreasing the value of “fov”, but keep in mind that you are not directly setting your field-of-view except in the case where you are using a 4:3 display.
Notes:
In some Quake engines, by default when you open the console it animates down from the top of the screen fairly slowly. If you would rather not wait on this, you can change the animation speed with this setting:
scr_conspeed 9999
Us weak 21st-century gamers can't get along without a crosshair. Enable the crosshair by entering
crosshair 1
in the console. This value will be saved to your config file.
Modern Quake engines may support drawing different crosshair styles if you set “crosshair” to other nonzero values. They may also have support for crosshair choice in the in-game menus.
If the view of your weapon model is just getting in your way, you can remove it with this setting:
r_drawviewmodel 0
GLQuake originally supported using either 16-bit color or 32-bit color, since early graphics cards and drivers might perform poorly or not at all with 32-bit color.
These days however, if you're not using a software-renderer engine then 32-bit color is probably what you want. In fact your Quake engine and/or graphics card/driver may not even support 16-bit color, or will at least default to 32-bit color.
But if you want to make sure that 32-bit color is being used, it's not a bad idea to be explicit about that with a command-line option:
-bpp 32
One of the most interesting things you can do with the console and config file is “key binding”: controlling what happens when you press a specific key. Key bindings are saved to your config file.
Open the config file in a text editor and look at what is bound to the number keys, the keys that you usually use to select weapons. For most engines, as an example, you'll see this line partway down the file:
bind 7 "impulse 7"
This just means that when you press the 7 key, it should execute the console command “impulse 7”, which happens to select the rocket launcher.
In most engines you can use the “bindlist” console command to call up a display of which keys do what.
A good description of key binding is out of scope for this guide, but you may want to search out more details. Quake players have sometimes gone a little crazy setting up detailed and complex things to happen at the push of a button.
One specific thing that Steam users may want to pay attention to is the screenshot key. Search the config file for the “screenshot” command, and for most engines you'll see something like this:
bind F12 "screenshot"
If F12 is your Steam screenshot key then this is redundant. To prevent F12 from triggering the Quake screenshot function, you can delete this line from your config file, or else while Quake is running use the console to enter the command
unbind F12
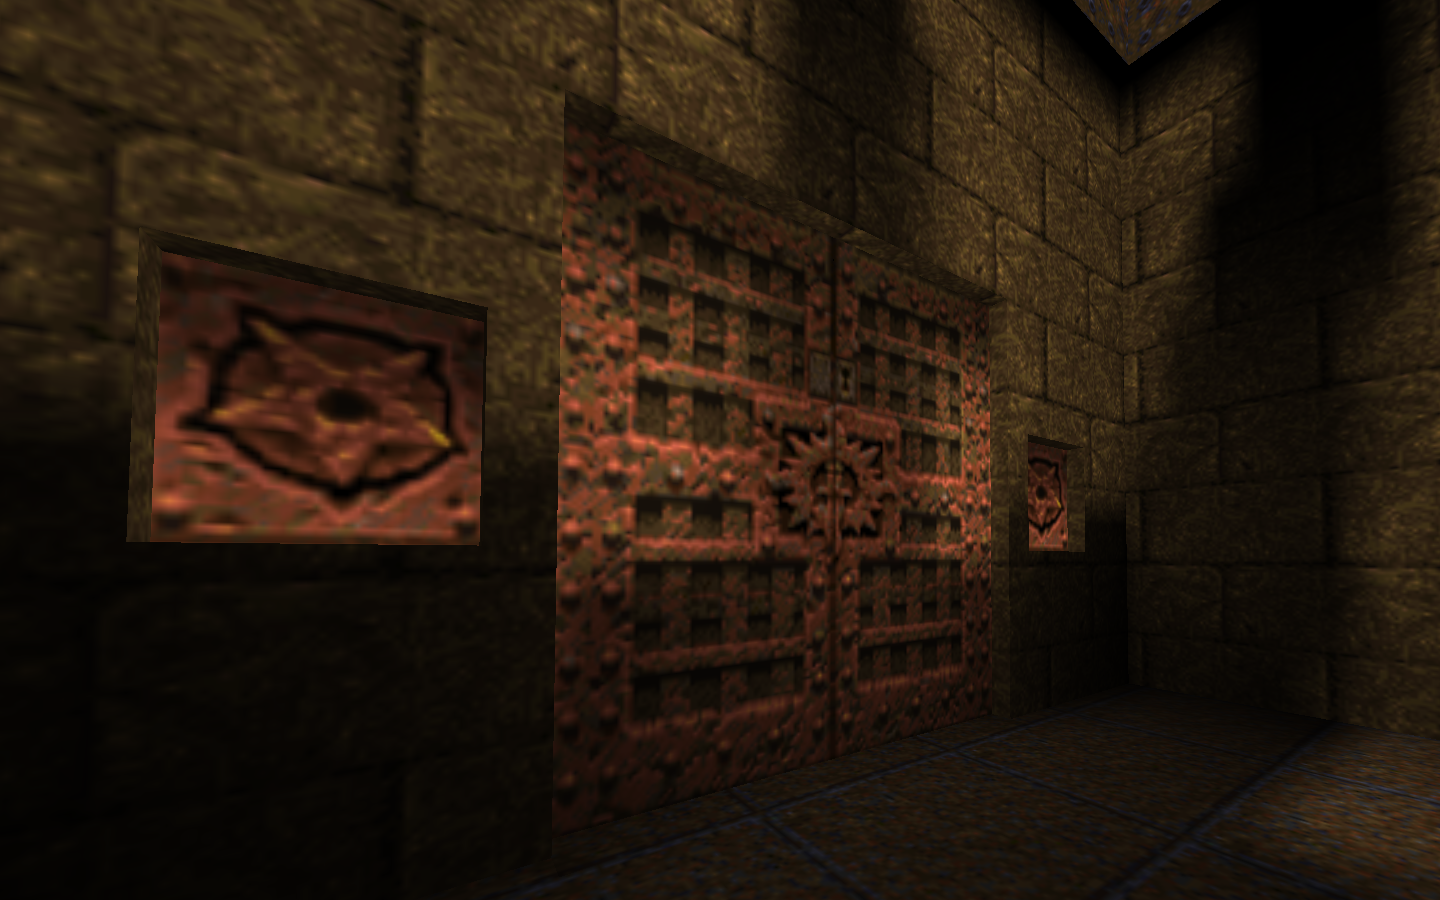
If you're interested in re-creating the original Quake appearance then you should read the page at quaddicted.com about differences between software rendered Quake and GLQuake.
One of the basic takeaways from that page is that you may want to change the texture filtering in Quake to make it more “pixel-y”. The quaddicted.com page has several comparison shots, but here's another (click for large versions to best see the difference): ![]()
The left image is the familiar GLQuake filtered look; the right image is still an OpenGL renderer but its textures look more like the original software Quake.
If you are using an engine with an OpenGL renderer then you can do this with a console variable:
gl_texturemode GL_NEAREST_MIPMAP_LINEAR
Some engines will save this to the config file, but in other cases you'll need to put it in autoexec.cfg to make it stick.
This same console variable is also available in DirectQ and the Direct3D version of ProQuake, even though they use a Direct3D renderer. It also works when using the Direct3D mode of FTE.
Engoo has a somewhat similar option through the “r_filter” console variable, which can be used to enable or disable texture filtering. By default it is disabled, but some of Engoo's available graphics presets will enable it.
qbism Super8 specifically does not support GLQuake-ish texture filtering, so it's a non-issue there.
For information about soundtrack music and sound sample rate, see this guide: Quake Soundtrack Solutions
Most Quake engines don't significantly (or at all) change the behavior of Quake game objects.
DarkPlaces however is an exception; it makes quite a few changes. Most of these changes are intended to fix bugs, but sometimes fixes can have unintended consequences.
You can individually enable or disable those changes using special DarkPlaces console variables that begin with the prefix “sv_gameplayfix_”. When one of those variables is set to 1, it enables a particular change/fix/feature; a value of 0 disables. Some of these may be enabled by default. The default values depend on which version of DarkPlaces you're using.
The DarkPlaces readme lists what each of these variables controls, if you're curious.
A generally safe approach is to set all of the DarkPlaces “sv_gameplayfix_” variables to 0 except for “sv_gameplayfix_droptofloorstartsolid”, which you probably want to have set to 1. If “sv_gameplayfix_droptofloorstartsolid” is set to 0 then some items may immediately fall through the floor and vanish when a level begins. Having a 0 value for that variable is the usual cause of maps appearing to have fewer items when played using DarkPlaces.
If you're using DarkPlaces with the above fix and you still have problems with missing or misbehaving objects, also try setting the “sv_gameplayfix_upwardvelocityclearsongroundflag” and
“sv_gameplayfix_setmodelrealbox” console variables to 1.
In any case, if you're having problems with a particular map then the first thing you should do is check the readme file that came with the map. The readme will usually indicate which Quake engines were used to build and test the map, and the most problem-free approach is to use one of those engines to play it.
It's worth mentioning that almost all custom singleplayer maps are tested against the QuakeSpasm engine or its predecessor Fitzquake. QuakeSpasm is a good bet for getting the intended behavior from a singleplayer map, unless the map's readme specifically says otherwise.
The original Quake engines, and to some extent modern engines as well, have hard limits on how much memory they can use for certain purposes.
Two of the primary limits can be manipulated using the “-zone” and “-heapsize” command-line options for most engines. Broadly speaking, “-zone” controls memory allocated to console scripts, and “-heapsize” the general memory pool used during gameplay. Both are expressed in kilobytes.
If you have a reasonable amount of RAM, then you can easily blow out both of these values large enough to be sufficient for just about any use of Quake, such as:
-zone 2048 -heapsize 192000
That's less than 200MB of memory allocated for Quake, and it would be verrrrrry unusual for any bit of Quake content to need more than that.
In any case, if you download something like a map or mod to try out, be sure to check the readme file. It may contain requirements for these command-line options or for some console variables that control other limits.
Hopefully the above sections help to show what options are out there and how to change them, but to wrap things up I'll summarize what I use for running Quake in the next couple of sections.
Note that I don't use most of these engines very often. If you notice something that I'm doing wrong please let me know!
And keep in mind that the values shown below are specifically for the settings I personally like to use. If you use a different resolution, FOV, or whatever then the rest of the guide above should help you determine what values to use.
I usually set my mouse sensitivity and Y-invert through the console, but that's not shown below. I sometimes adjust the scale of HUD elements but those settings aren't shown below. I also “unbind F12” (the default screenshot key) to avoid a conflict with the Steam overlay screenshot key… if you launch Quake through Steam then you'll probably want to do the same, if not then not.
For modern Quake engines, my command line options tend to be
-dinput -heapsize 192000 -bpp 32
When using a software-renderer engine, I omit the “-bpp 32” option.
I don't bother with the “-zone” option since I don't have gigantic console scripts, and many of the modern Quake engines no longer use the “-zone” option anyway.
The “-dinput” option is irrelevant for DirectQ, and “-heapsize” is ignored by a few engines (FTE, Fodquake, DarkPlaces, DirectQ), but it doesn't hurt to specify them. So I'm lazy enough to just always use the same command line.
I would use these options for Quake/QuakeWorld:
-dinput -heapsize 192000
For GLQuake/GLQuakeWorld I would use these for 1920x1080:
-dinput -heapsize 192000 -width 1920 -height 1080 -conwidth 864 -conheight 486 -bpp 32
or these for 1920x1200:
-dinput -heapsize 192000 -width 1920 -height 1200 -conwidth 768 -conheight 480 -bpp 32
(Assuming version 0.98 for GLQuake; it's not worth putting up with earlier versions in my opinion.)
When it comes to console settings, the three popular QuakeWorld clients can be treated a little differently than other engines. So let's tackle them first.
 ezQuake
  FTE
FTE  Fodquake
A quick way to get a bunch of settings into one of these engines is to put the settings all into some file in the “id1” folder, start up Quake, and then use the “exec” console command to read that file. For example if you have your settings in the file “foo.cfg”, you can import those settings with the console command
exec foo.cfg
Next you should explicitly save the settings to your config file with this console command:
cfg_save
or by using the appropriate menu option to save settings/configuration.
These are the settings that I would use for those engines after choosing a 16:9 resolution like 1920x1080 in the in-game menus:
cl_backspeed 400
cl_forwardspeed 400
gl_texturemode GL_NEAREST_MIPMAP_LINEAR
scr_conspeed 9999
vid_conwidth 864
vid_conheight 486
or these settings after picking a 16:10 resolution like 1920x1200:
cl_backspeed 400
cl_forwardspeed 400
gl_texturemode GL_NEAREST_MIPMAP_LINEAR
scr_conspeed 9999
vid_conwidth 768
vid_conheight 480
For ezQuake I would also include a setting of “fov 106” or “fov 100”, respectively, to fix the field of view. For FTE or Fodquake I'd leave “fov” at its default value of 90 since they internally take care of increasing the field of view for widescreen resolutions.
You can also experiment with different values (or menu choices) for the “crosshair” variable.
For all other modern Quake engines, some of the settings may be automatically saved to your config, and some may not be. One way to deal with this is just to put them all into your autoexec.cfg file so that they get set every time Quake launches.
Of course this means that some settings will end up both in your config file and in autoexec.cfg. If you think that could lead to some confusion, then you can pare down your autoexec.cfg file – delete any lines that contain settings covered by the config file. It's up to you how you want to handle that.
So generally speaking these are the settings that I like:
cl_backspeed 400
cl_forwardspeed 400
crosshair 1
gl_texturemode GL_NEAREST_MIPMAP_LINEAR
scr_conspeed 9999
sv_aim 1
+mlook
If the engine doesn't automatically adapt FOV for widescreen, I'd want to use “fov 106” for a 16:9 resolution (like 1920x1080) or “fov 100” for a 16:10 resolution (like 1920x1200).
I could get away with just throwing all of these settings into autoexec.cfg. Some are redundant or unnecessary for some modern Quake engines. And for DarkPlaces and Qrack I'd also want to fix “vid_conwidth” and “vid_conheight”. But that's the general idea.
If you want specifics about which of those settings are needed for which engines, and which are saved to the config, then I've captured below the way it looked to me when I tested each engine.
 DarkPlaces
These settings will be saved to the config file:
cl_backspeed 400
cl_forwardspeed 400
vid_conwidth 864
vid_conheight 486
(or “vid_conwidth 768” and “vid_conheight 480” for a 16:10 resolution like 1920x1200)
You can also experiment with different values for the “crosshair” variable.
This setting is not saved in the config file (must be in autoexec.cfg):
gl_texturemode GL_NEAREST_MIPMAP_LINEAR
I'd leave “fov” at its default value of 90 since DarkPlaces internally takes care of increasing the field of view for widescreen resolutions.
 QuakeSpasm
These settings will be saved to the config file:
cl_backspeed 400
cl_forwardspeed 400
crosshair 1
gl_texturemode GL_NEAREST_MIPMAP_LINEAR
scr_conspeed 9999
+mlook
I'd leave “fov” at its default value of 90 since QuakeSpasm 0.85.9 and later versions internally take care of increasing the field of view for widescreen resolutions. If you do need to change “fov” then you must put it in autoexec.cfg.
 Fitzquake Mark V
These settings will be saved to the config file:
cl_backspeed 400
cl_forwardspeed 400
crosshair 1
These settings are not saved in the config file (must be in autoexec.cfg):
gl_texturemode GL_NEAREST_MIPMAP_LINEAR
scr_conspeed 9999
sv_aim 1
I'd leave “fov” at its default value of 90 since Fitzquake Mark V internally takes care of increasing the field of view for widescreen resolutions. (Except in revision 15; see the note in the “Display: FOV” section.) If you do need to change “fov” then you must put it in autoexec.cfg.
 DirectQ
These settings will be saved to the config file:
cl_backspeed 400
cl_forwardspeed 400
gl_texturemode GL_NEAREST_MIPMAP_LINEAR
These settings are not saved in the config file (must be in autoexec.cfg):
fov 106
scr_conspeed 9999
sv_aim 1
(or “fov 100” for a 16:10 resolution like 1920x1200)
 Engoo
Engoo
These settings will be saved to the config file:
cl_backspeed 400
cl_forwardspeed 400
crosshair 1
r_filter 0
sv_aim 1
These settings are not saved in the config file (must be in autoexec.cfg):
scr_conspeed 9999
+mlook
I'd leave “fov” at its default value of 90 since Engoo internally takes care of increasing the field of view for widescreen resolutions. If you do need to change “fov” then you must put it in autoexec.cfg.
Also note that while I'm using “+mlook” to enable mouselook (for consistency), there's also another way to handle that with Engoo; see the “Mouselook” section for details.
 qbism Super8
These settings will be saved to the “super8.cfg” config file:
cl_backspeed 400
cl_forwardspeed 400
These settings are not saved in the config file (must be in autoexec.cfg):
fov 106
scr_conspeed 9999
(or “fov 100” for a 16:10 resolution like 1920x1200)
 ProQuake
These settings will be saved to the config file:
cl_backspeed 400
cl_forwardspeed 400
fov 106
scr_conspeed 9999
(or “fov 100” for a 16:10 resolution like 1920x1200)
These settings are not saved in the config file (must be in autoexec.cfg):
gl_texturemode GL_NEAREST_MIPMAP_LINEAR
sv_aim 1
 Qrack
Qrack
These settings will be saved to the config file:
cl_backspeed 400
cl_forwardspeed 400
vid_conwidth 864
vid_conheight 486
(or “vid_conwidth 768” and “vid_conheight 480” for a 16:10 resolution like 1920x1200)
These settings are not saved in the config file (must be in autoexec.cfg):
fov 106
gl_texturemode GL_NEAREST_MIPMAP_LINEAR
scr_conspeed 9999
(or “fov 100” for a 16:10 resolution like 1920x1200)
The original engines are consistent in saving “cl_backspeed”, “cl_forwardspeed”, “crosshair”, and (in the QuakeWorld case) “noaim” to the config file. Anything else among the settings below must be placed in autoexec.cfg if you want them to take effect every time you play.
For the original (non-GL) Quake and QuakeWorld engines, widescreen is not supported, so I wouldn't change the FOV. These settings would be useful for Quake:
cl_backspeed 400
cl_forwardspeed 400
crosshair 1
scr_conspeed 9999
sv_aim 1
+mlook
And these for QuakeWorld:
cl_backspeed 400
cl_forwardspeed 400
crosshair 1
noaim 1
scr_conspeed 9999
+mlook
For GLQuake I would use these settings (the “fov” setting only works with GLQuake 0.98):
cl_backspeed 400
cl_forwardspeed 400
crosshair 1
fov 106
gl_texturemode GL_NEAREST_MIPMAP_LINEAR
scr_conspeed 9999
sv_aim 1
+mlook
(or “fov 100” for a 16:10 resolution like 1920x1200)
And these for GLQuakeWorld:
cl_backspeed 400
cl_forwardspeed 400
crosshair 1
fov 106
gl_texturemode GL_NEAREST_MIPMAP_LINEAR
noaim 1
scr_conspeed 9999
+mlook
(or “fov 100” for a 16:10 resolution like 1920x1200)
The singleplayer Quake screenshots in my Steam account were almost all taken using some variety of Fitzquake – either QuakeSpasm, Fitzquake Mark V, or the original Fitzquake. Along with the basic settings described in this guide I typically use the following settings when I play singleplayer in those engines:
scr_sbaralpha "0.75"
scr_sbarscale "1.5"
scr_crosshairscale "2"
gl_texture_anisotropy "8.000000"
…and so I was probably using something like that when taking screenshots, but no guarantees. :-)
The web is full of Quake stuff old and new. I can't try to be comprehensive but here's a few good links. First here are the two sets of console and command-line documentation already referenced throughout this guide:
Also some general Quake information:
And you can use your config and command-line skillz to investigate new maps and mods, as described in this guide: Custom Singleplayer Levels
The most recent date that I checked out these engines' features was May 03 2015.
The latest stable version of each engine was:
2015
2014
2013
This guide is also hosted at the Steam community site: Quake Owner's Manual
If you have comments, questions, corrections, or additions, please post a comment on the guide over there. Or, you can send me an email at my address below.

 ) except where indicated otherwise