

This is the info page for the Quake Singleplayer Complete configurations for the Steam Controller. You should be able to find these by browsing the Steam Controller configurations for Quake, or you can use the configuration links below to go to them directly if you're currently on a computer where you have Steam installed.
There are four variants of the configuration (described in the Steam Setup section) so be sure to pick the one that will work for you. You'll also need to grab the custom icons linked below; and, since Quake is an old game with no native Steam Controller support, it requires a little setup to get going. I've had a lot of fun with this though, so for me the setup was worth it.
The config's main goals are to let you keep your thumbs on the movement/aiming controls at all times, to allow instant selection of almost any weapon, and to minimize the need to use the virtual keyboard. The controller is not mouse-precise, but the combination of touchpad+gyro makes for smooth and fast aiming once you get used to it, and to me it's not frustrating in the way that Quake with a normal gamepad can be. I do crank the difficulty down a notch but with that concession it works great for singleplayer, especially when I'm more interested in exploring environments than in testing the outer limits of my shooter reflexes.
The setup process has three parts. Details about those parts are broken out into three other pages here:
Take a look at the Config Description below, especially to see how the bumpers and left trigger control weapon selection.
If you find that a controller input is not doing what it is labelled as doing, you probably do not have the correct (default) binding for the associated key in your Quake config. As described in the Quake Setup section, you can use Quake's options menu or the default keybinds config to apply the necessary keybinds.
It is normal to sometimes see "no weapon" messages in the upper left corner of the screen when using some of the weapon-select controls.
Sometimes Quake will present a dialog that asks you to press Y to confirm, such as when quitting or when starting a new game in the middle of the current game. You can use the middle button of the touch options menu to do this. In some cases when using Steam — especially Steam streaming — I haven't been able to see that dialog and/or the touch options menu, so it looks as if Quake is sitting there not responding to my actions. If this happens to you, you can still respond to the dialog (even if it is invisible) using the touch options menu (even if it is invisible): squeeze the right grip and press the middle of the left touchpad to confirm, or press the "B" controller button to cancel.
If you're using the "MP1 WEAPONS" action set when playing missionpack 1, but the controls for selecting the laser and hammer weapons don't work, then your Quake configuration doesn't have those keybinds properly configured. More about this under "Default Keybinds" in the Quake Setup section.
Final note: This config was tested using a system that can run Quake at its framerate cap of 72 FPS. If your system runs Quake at a lower framerate, I can't guarantee that everything will work. In particular the left-stick movement in the non-joystick-move variant of the config, and the behavior of some of the weapon-select inputs, could be affected if your framerate is unusually low.
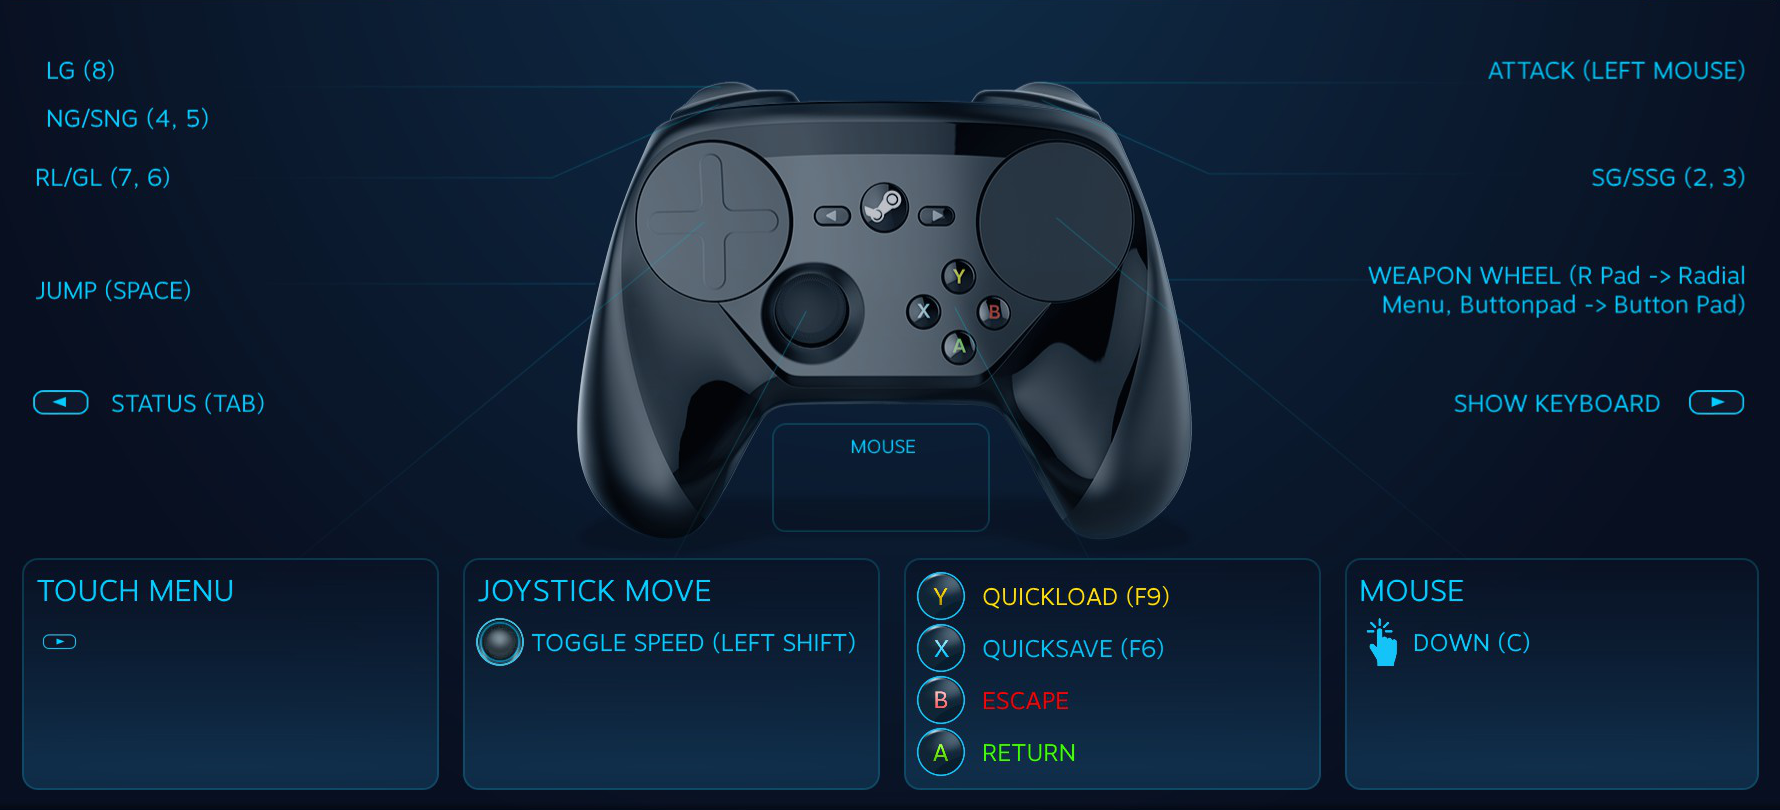
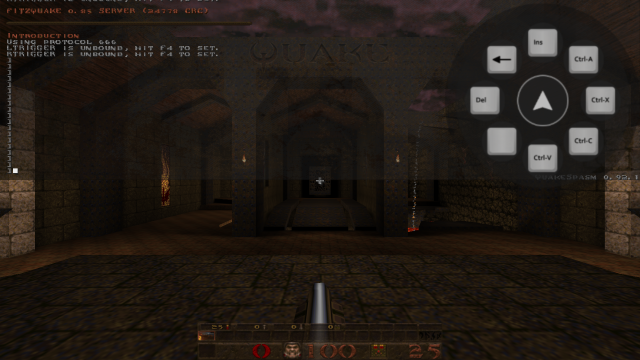
This is a screenshot of the main control inputs taken from Steam (click for big version). It doesn't show the radial menus, or explain how the weapon-select inputs and some of the other special buttons and modes work, so let's get into the details below.
You can take a Steam screenshot by holding the Steam button + right trigger (this is the usual Steam Controller behavior).
This is different from the internal Quake screenshot feature, which is normally triggered by the F12 key. This controller configuration does not have an input assigned for that.
The virtual keyboard is accessible through the Start button (to the right of the Steam button). Generally you will only want to use it for typing in the Quake console.
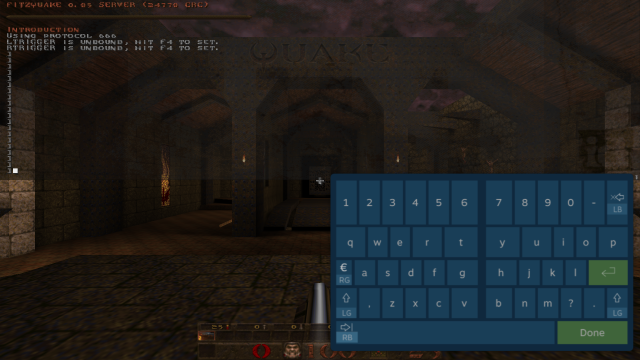
The virtual keyboard has its own controller configuration while it is active. Use buttonpad X to cycle the keyboard to different screen positions. Use the right/left touchpads to select virtual keys and the right/left triggers (or pad clicks) to type the selected key. Bumpers and grips change the keyboard layout in various ways. Click the virtual Done key to dismiss the keyboard. All other controller inputs described below only apply when the virtual keyboard is not active.
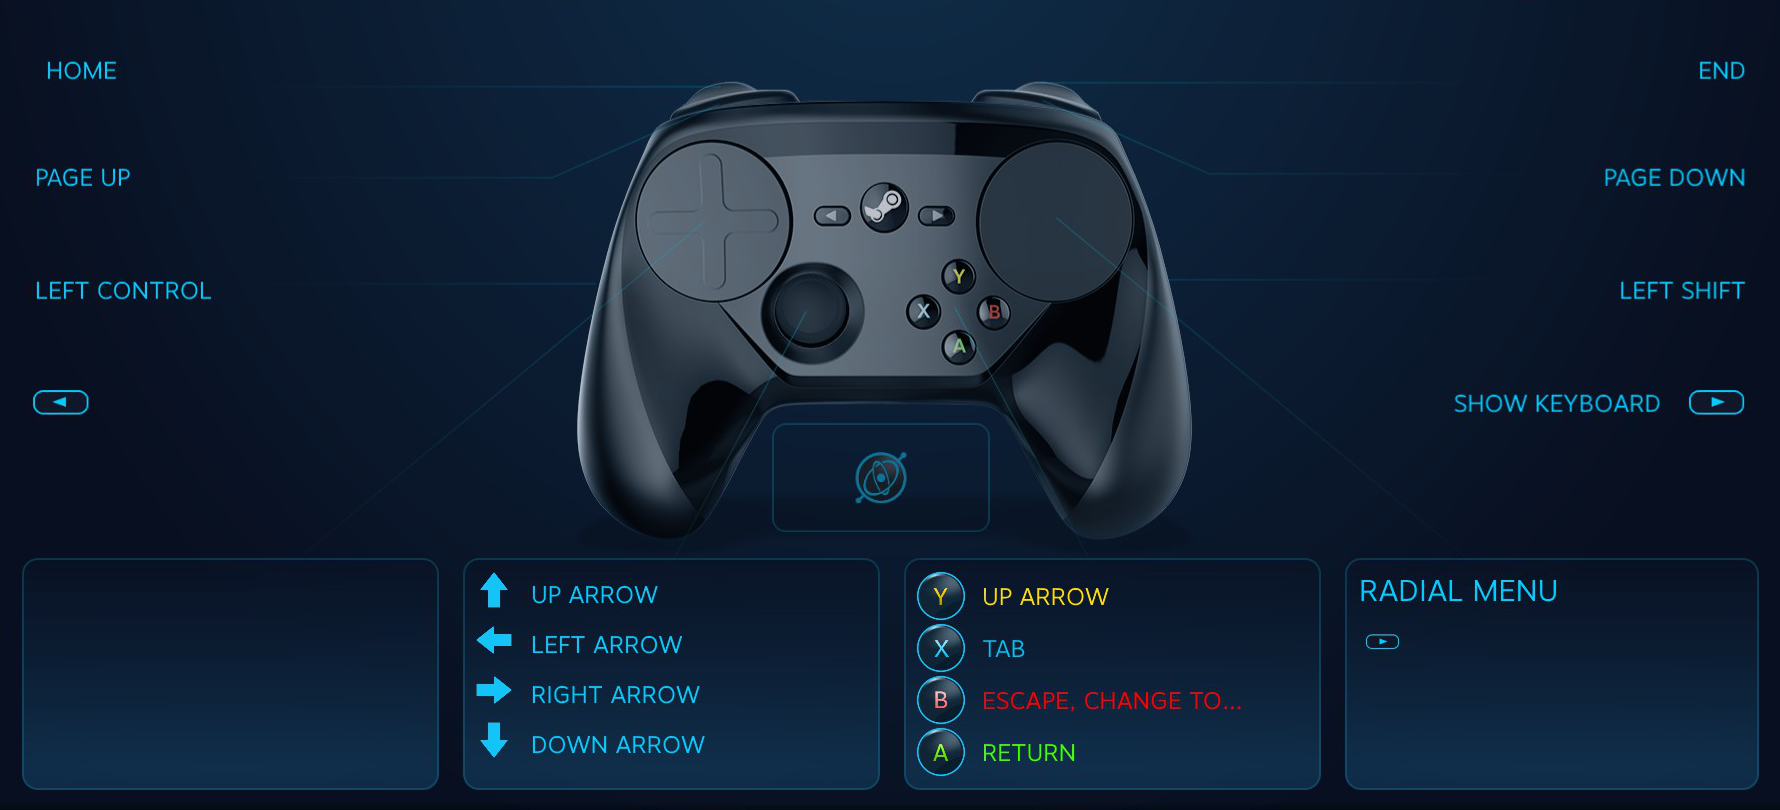
If using a joystick move variant of the controller config (and your Quake program supports XInput gamepads), you can use the stick to navigate up/down the menus and do left/right inputs for certain options.
If not using joystick move, then you will need to use the virtual up/down/left/right inputs on the left touchpad.
If using a joystick move variant of the controller config, the stick is acting as an XInput joystick; if not using joystick move, then stick movement will activate the default movement keys in patterns determined by the Steam Controller's "analog emulation" input mode. You shouldn't have to care about this difference, except to be aware that the joystick move variant will only work if your Quake program supports XInput gamepads.
The speed key toggle is not terribly useful; the stick click is an awkward input, and everyone plays with Always Run enabled anyway (or using a config that permanently activates the speed key). It's mainly just included for completeness. If you do use it, note that switching to console keys mode or switching to/from the missionpack 1 weapon set will cancel a speed key that is toggled on.
For the left trigger pulls that can select multiple weapons, the weapons are listed in increasing order of priority.
The weapon wheel is a click-to-select radial menu of all weapons.
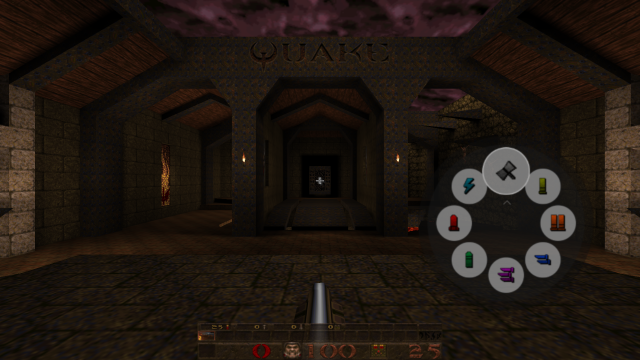
If the missionpack 1 weapon set has been selected in the Options touch menu (described below) then the laser and hammer weapons are included in the wheel. The missionpack 1 weapon set also adds two other inputs:
This config also includes a touch menu of options. If using a joystick move variant of the controller config, this menu will always be available on the left touchpad. If not using a joystick move variant, you can make the menu available on the left touchpad by holding the right grip.

These menu options are:
The missionpack 1 weapon set toggle affects the controls as described in the Weapon Selection section above.
The Y key is useful for confirming some dialogs.
Mouselook toggle is included mostly for completeness; it is better to modify your Quake configuration to permanently enable mouselook (or use a modern Quake engine that has a menu option for that). If you do use this toggle to enable mouselook, you'll have to turn it on each time you start up Quake; also note that switching to console keys mode or switching to/from the missionpack 1 weapon set will cancel it.
The option to enable "console keys mode" without opening the console is provided because sometimes Quake will dump you into the console on its own initiative.
This mode can be entered through the Options touch menu as described above. It provides useful inputs for dealing with the Quake console. However, note that most of the special keys and key-combos only have effects in modern Quake engine consoles (not in the original GLQuake), and their effects may vary among Quake engines. You can also access the virtual keyboard (Start button) while in console keys mode.
The special keys radial menu provides a few other inputs and includes a center button that can be used to close the console and exit "console keys" mode.

 ) except where indicated otherwise
 Linux Desktop Integration
 Singleplayer Starter Pack
 Steam Controller Quake
 Gameserver Scripts
 quakesounds
 QL pk3 Support in 7-Zip
 MeshTex GtkRadiant Plugin
 Birdseye Map Overviews
 QSmack Quake Admin